Author: Lacey

The 3-4-5 Rule

No Comments

When planning a new coop (or any other structure), it’s best to start on the right foot. In most cases, the right foot calls for right angles, which aren’t always the easiest things to set up. While framing squares and similar tools can come in handy, they’re not always the best solution for straightening up a large-scale footprint. So if you find yourself struggling to square up corners while laying out a new chicken coop or run, consider turning to an even simpler, older method.

Remember algebra class? You might not want to, if you’re anything like us, but it’s time for one of those old formulas to come in handy:

a2 + b2 = c2

The Pythagorean Theorem. It’s what we’ll be using to keep those corners right. It’s an ancient, ancient geometric equation that’s been around since Babylon, and for good reason. Put simply, the theorem states that, in a right triangle, the square of length of the hypotenuse (the triangle’s longest side) is equal to the sum of the squares of the other two sides.

That might not seem immediately helpful in our case, but there’s another side to that formula. If you can lay out a triangle in which a2 + breally does equal c2 then you’ve just created a triangle containing a right angle, the very thing we need for our corners. Which finally brings us to the 3-4-5 rule.

measurements

A 3-4-5 triangle is a very, very basic right triangle. It has a hypotenuse measuring 5 of whatever units you please (yards, feet, light-years – whatever), and two sides measuring 3 and 4 of those units respectively. Here’s how to put those relationships to work:


  1. Identify where you want to lay out your corner.
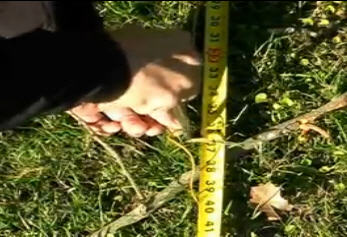
  2. Find some way of marking distance. This can be as simple as a set of pegs, some cord, and a tape measure.
  3. Measure out three feet on one side of your corner, and four on the other. The two lines should form a rough right angle.
  4. Measure precisely five feet from the end of your three foot line to the end of your four foot line. Adjust the lines as necessary until you reach that five foot measurement. Once you do, congrats! You’ve made your first correct corner.
  5. Repeat three times.

At the end of all that, you ought to have a regular, rectangular footprint laid out. Of course, 3-4-5 triangles aren’t the only right triangles, so feel free to adjust that distance as needed. Large structures might call for a 9-12-15 triangle, and small ones might need a 1.4-2-2.5. And so on – adjust as needed, and you’ll have your corners every time. Good luck!

Categories: construction

Adding A Raised Feeder Area

No Comments

Over the years the Lewis Family Farm has refined the chicken tractors used and has come up with several tips and tricks for useful things to incorporate into your chicken tractor design. One such thing is a raised and enclosed shelf for the feed bowls. The raised shelf will allow the feed bowls to move with the tractor when you move it to its new location. The fence around the feed bowls allows the chickens to stick their head in to get the feed but not their butt. Having an access door on the outside allows you to easily top up the feed. Keeping the chickens out of the feed means less waste and better hygiene.

chickens feeding

You can also build a roof over the feeder area protecting it from rain. We don’t worry about a roof over the feeder area on our tractors. For the most part we feed whole grains and if they do get rained on we usually just dump them on the ground and let the chickens clean them up from there.

Two inch by three inch garden fence is used to enclose the feeder in. If you have a rooster with a big comb you will need to clip some of the wire so that you have a bigger opening. One idea for this is to clip every other one. While this works great for adult chickens small chicks can slip through the fence.

chicks eating

We’ve been very happy with this design and we’ve incorporated this into all our chicken tractors, even the small cultivator tractors have a raised feeder area. By incorporating this design you’ll never have to go to the back of the cage to retrieve feed bowls ever again. Your feed bowls will stay cleaner and you’ll have less wasted feed. You can see this, and other tractor design tips in the video below.

Categories: ideas

Building Cheap Chicken Tractors

No Comments

Building a low cost chicken tractor doesn’t have to mean that it is flimsy or low quality. In many cases they can be built quite economically using recycled parts. An a frame design (so-called because of its triangular shape like an ‘A’) is probably the simplest tractor to build. The framing could be done with pieces of wood you have lying around or are able to re-use from an old fence, or pallets, or perhaps purchased cheaply from a builders yard or the classified ads of someone wanting their old shed torn down etc. There are many opportunities for free or cheap materials out there if you are on the lookout for them. Even when purchasing 2x4s for the job many find the total cost is often under $50 (depending on size) and cetainly under $100.

Many people just use chicken wire for the run part of an aframe but that is not really strong enough to withstand any serious attempts from predators to get in. The strongest wire is galvanised steel mesh with small holes (so nothing can reach in easily) such as hardwire cloth. You also want there to be an area for them which is totally covered even if your chickens are not going to be living in it over night – this is so that they can feel more secure and can go behind a wall if there is a predator on the other side of the wire, rather than be eyeball to eyeball with it. It also, perhaps more importantly, gives them some shelter from the wind and rain and somewhere to go that is shaded from the sun.

Adding wheels to the base will allow it to be moved more easily although with small chicken tractors, especially if they are made from light-weight materials, they are usually fairly easy to lift and be moved by two people.

Because they are generally lightweight and not fixed to anything you will need to consider strong winds etc. and also how easy it will be for something to dig under into the coop (or have your chickens accidentally dig themselves out when dustbathing!). A wire ‘skirt’ around the base of the coop should help deter things like rats trying to dig in.

The video below shows work on building an A-frame coop on wheels, starting with the ramp for their chickens to come down from the house part (this particular coop has two levels).

Categories: a-frame chicken coop

It’s all for the girls

No Comments

Moving your chickens to fresh ground gives your birds new grass every few days when they can’t free range. Keeping them safe and the tractor ‘critter proof’ is obviously very important, as is being able to access the house part easily to collect eggs and for cleaning purposes.

An interesting example is shown in the video below. Built primarily with 2x4s, hardware wire cloth, and some left over shingles it also has wheels and a handle for moving it to new ground and also a hole for ventilation, and shade considerations.

The girls should be happy 🙂

Categories: ideas